NGrid Objective-C Tutorial
Overview
This short tutorial explains the main concepts of the NGrid framework and helps you learn how to create tables using NGrid.
NGrid is a powerful library to create tables, grids and spreadsheets. It’s easy to use, easy to customize, optimized for work with large datasets and include functions for data interaction and analysis.
Introduction
This tutorial will show you how to install NGrid framework and build a simple project that demonstrates core usage and customization capabilities. The tutorial is related with samples provided on the NGrid macOS .dmg that can be downloaded here.
Installation
First, download the NGrid macOS .dmg. It is recommended to install the framework as it will allow you to add it via the "Developer Frameworks" section in Xcode. To install the framework, run “Install.pkg”. The documentation will be installed to Xcode automatically with the framework. Alternatively, you can just copy the framework to your disk and then link it through the “Add Other...” option. The framework is located in the “NGrid.framework” directory, its documentation is located in the “Documentation” directory, and the set of samples is located in the “NGrid/ObjectiveC-Samples” directory.
For each sample, there is a pre-made Xcode project, so you can check them out to see whether everything works properly.
However, in this tutorial you will learn how to create a project from scratch. Let’s begin!
Create a new project of the “Empty Application” type.
If you have installed the framework properly, you should be able to link it to your application in the usual way. Click the top-level element in your project’s tree (it contains the name of your project), select the tab “General”, scroll down and press the “+” button. Find the NGrid.framework that should be located in the “Developer Frameworks” section.
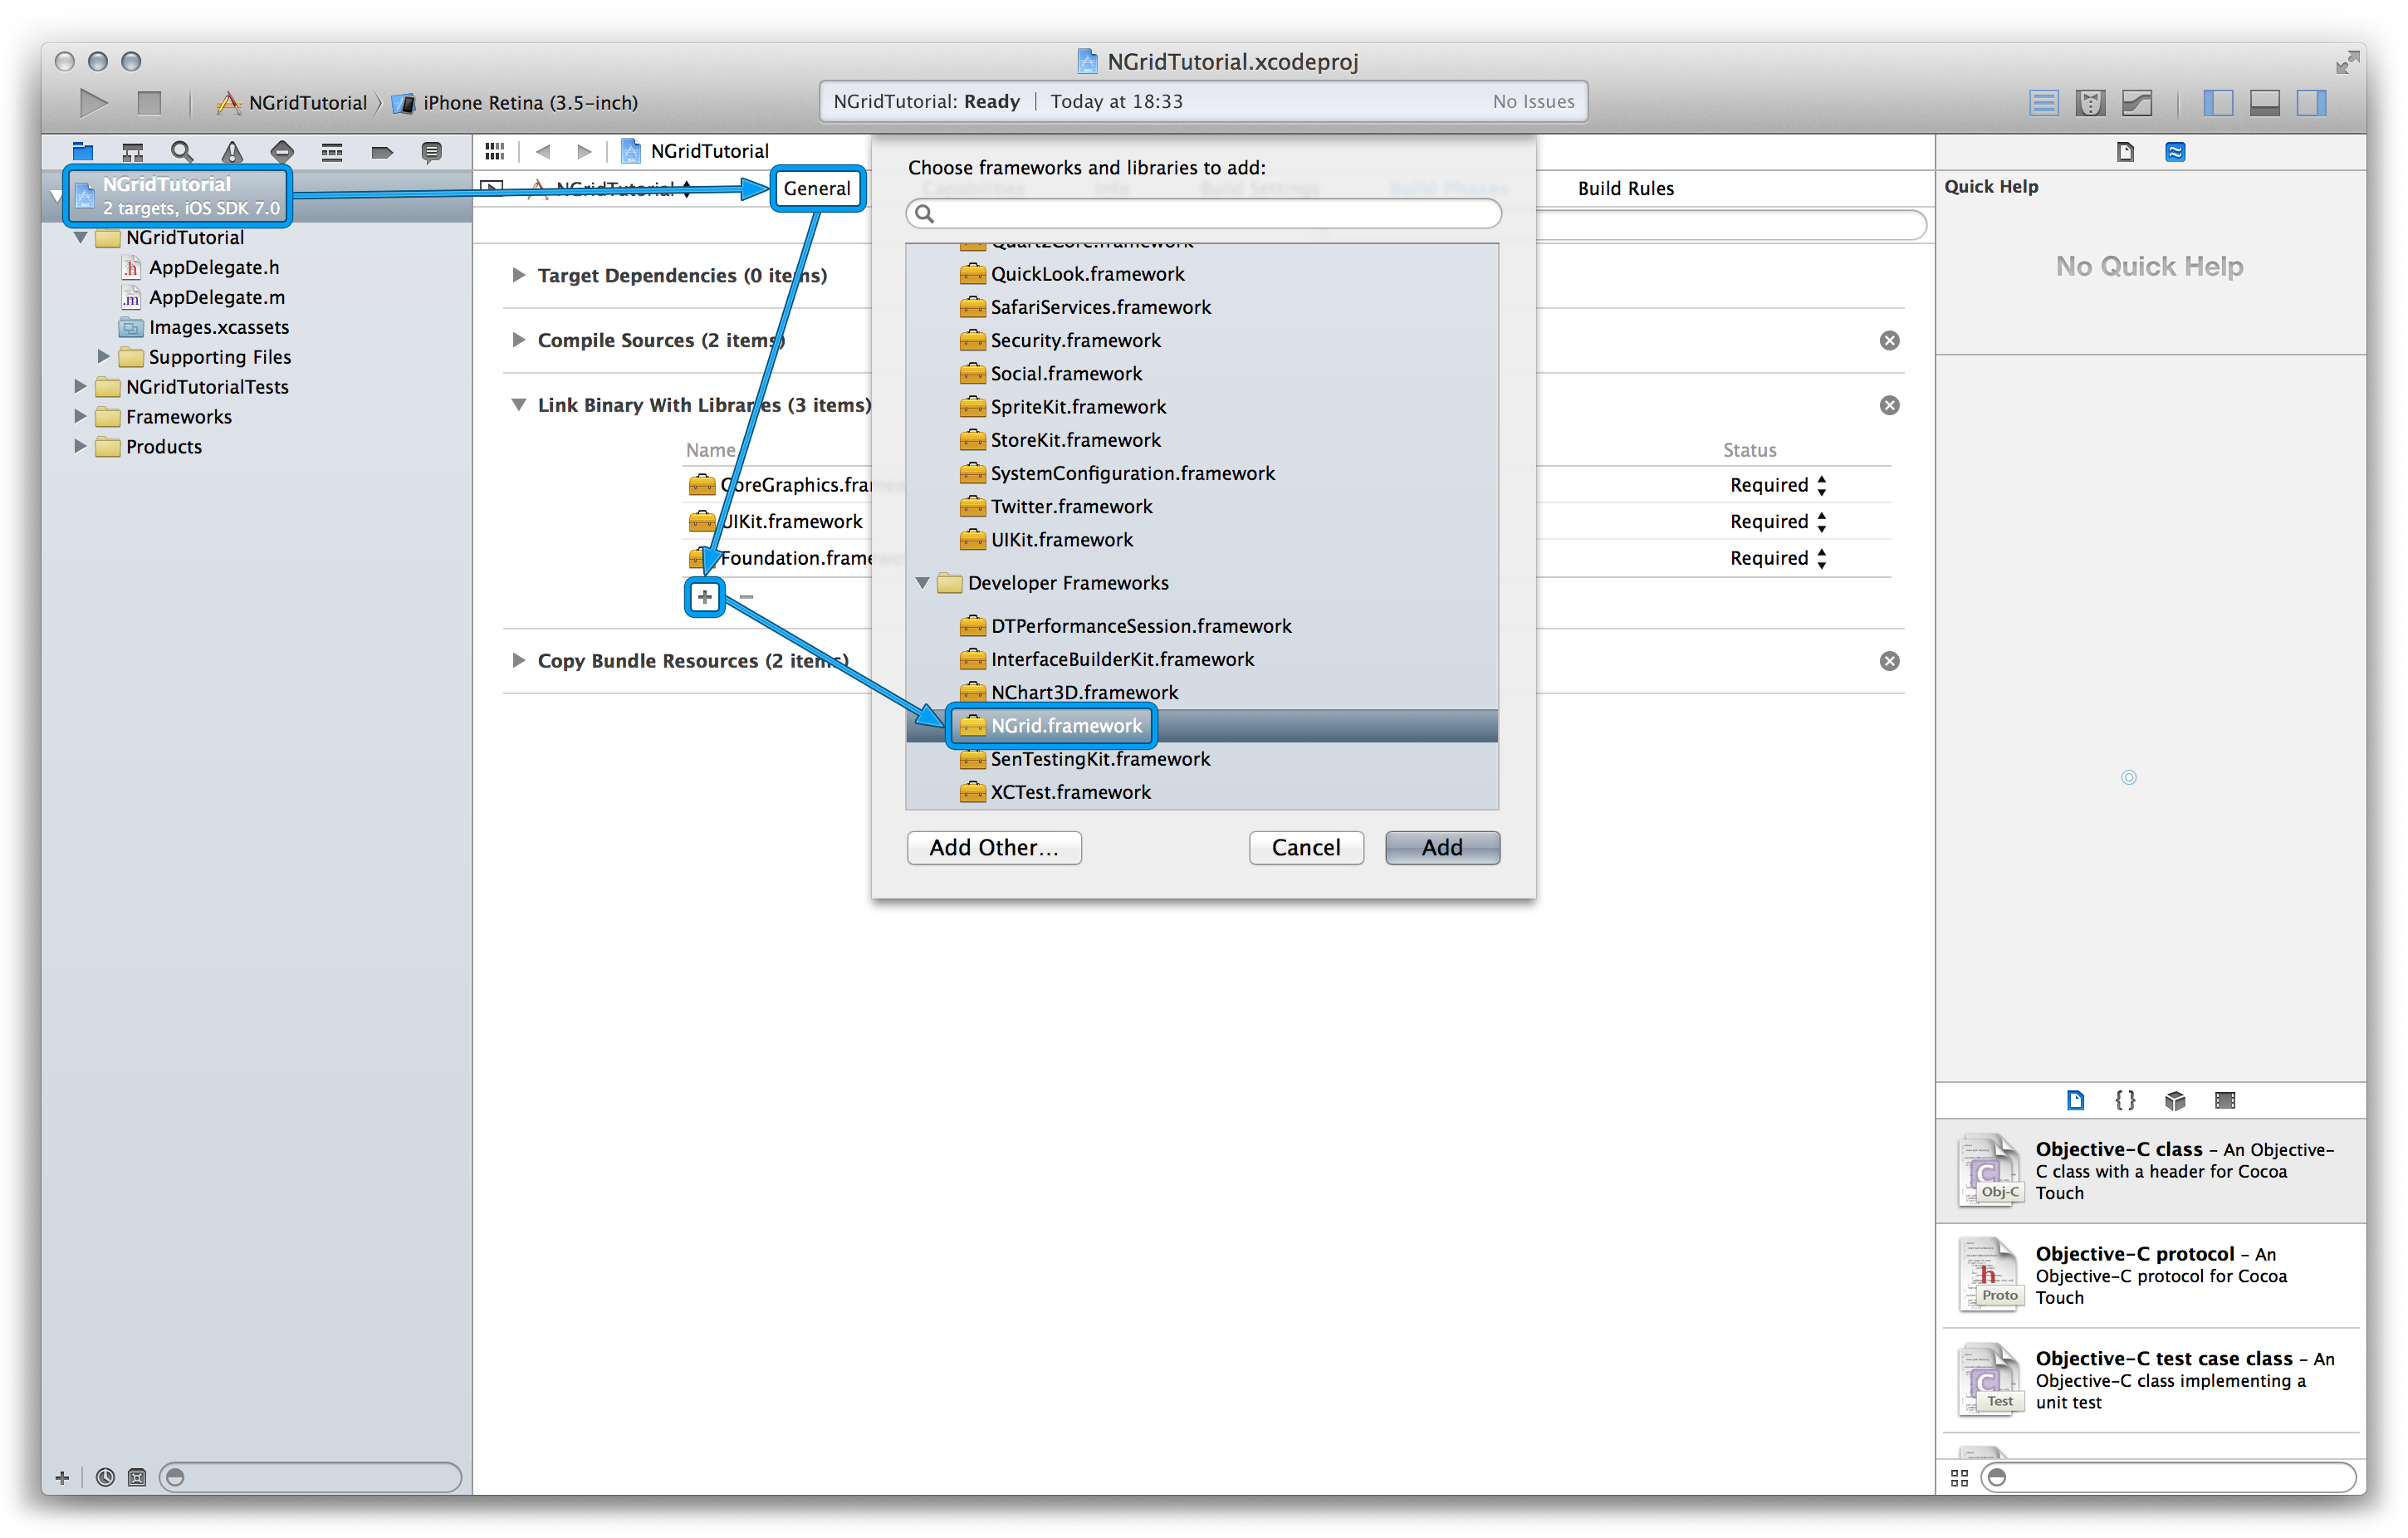
Double-click it, and it will be linked to your project.
After that add the value $(DEVELOPER_FRAMEWORKS_DIR) to the set of values of the option "Framework search paths" in the project settings.
Make a test run to check whether the project is able to build and run.
Now your project is set up and you are ready to start using the NGrid framework!
Please note that we are using ARC for the described project, but you can manage memory manually in your projects if you want to. NGrid supports both cases.
Simple Sample
First of all, create a new project as explained in Installation paragraph and create a view controller class (e.g. GridViewController). To work with NGrid you should import header file NGrid.h in GridViewController.h:
#import <NGrid/NGrid.h>@interface GridViewController : UIViewController <NGridDataSource, NGridDelegate>#pragma mark Data source stuff
- (NGridCell *)gridView:(NGridView *)gridView cellWithKey:(NGridCellKey *)cellKey {
NGridCommonCell *cell = (NGridCommonCell *)[gridView dequeueReusableCellWithIdentifier:@"CellID"];
if (cell == nil) {
cell = [[NGridCommonCell alloc] initWithReuseIdentifier:@"CellID"];
}
NSObject *cellValue = [self gridView:gridView valueForCellWithKey:cellKey];
cell.text = [NSString stringWithFormat:@"%@", cellValue];
return cell;
}
- (NSObject *)gridView:(NGridView *)gridView valueForCellWithKey:(NGridCellKey *)cellKey {
NSString *valuePrefix = nil;
switch (cellKey.type) {
case NGridCellTypeCornerHeader:
valuePrefix = @"Corner header ";
break;
case NGridCellTypeColumnHeader:
valuePrefix = @"Column header ";
break;
case NGridCellTypeRowHeader:
valuePrefix = @"Row header ";
break;
case NGridCellTypeRegular:
valuePrefix = @"Regular ";
}
return [NSString stringWithFormat:@"%@%d:%d", valuePrefix, cellKey.rowKey, cellKey.columnKey];
}
- (NSInteger)gridViewRowCount:(NGridView *)gridView {
return 15;
}
- (NSInteger)gridViewColumnCount:(NGridView *)gridView {
return 10;
}
- (NSInteger)gridViewRowHeaderCount:(NGridView *)gridView {
return 1;
}
- (NSInteger)gridViewColumnHeaderCount:(NGridView *)gridView {
return 1;
}
#pragma mark Delegate stuff
- (CGFloat)gridView:(NGridView *)gridView widthForColumnWithKey:(NSInteger)columnKey {
return 150.0;
}
- (CGFloat)gridView:(NGridView *)gridView heightForRowWithKey:(NSInteger)rowKey {
return 50.0;
}
- (CGFloat)gridView:(NGridView *)gridView widthForHeaderRowWithKey:(NSInteger)key {
return 200.0;
}
- (CGFloat)gridView:(NGridView *)gridView heightForHeaderColumnWithKey:(NSInteger)key {
return 75.0;
}Finally, we have to create and initialize NGridView and use our GridViewController as a root controller of application window. For this purpose we can use
loadView and viewDidLoad methods of GridViewController and application:didFinishLaunchingWithOptions: method of AppDelegate.
- (void)loadView {
    self.view = [NGridView new];
}

- (void)viewDidLoad {
    [super viewDidLoad];

    ((NGridView *)self.view).licenseKey = @"";

    ((NGridView *)self.view).dataSource = self;
    ((NGridView *)self.view).delegate = self;

    [(NGridView *)self.view reloadData];
}
- (BOOL)application:(UIApplication *)application didFinishLaunchingWithOptions:(NSDictionary *)launchOptions {
    self.window = [[UIWindow alloc] initWithFrame:[[UIScreen mainScreen] bounds]];
    self.window.rootViewController = [GridViewController new];
    self.window.backgroundColor = [UIColor whiteColor];
    [self.window makeKeyAndVisible];
    return YES;
}
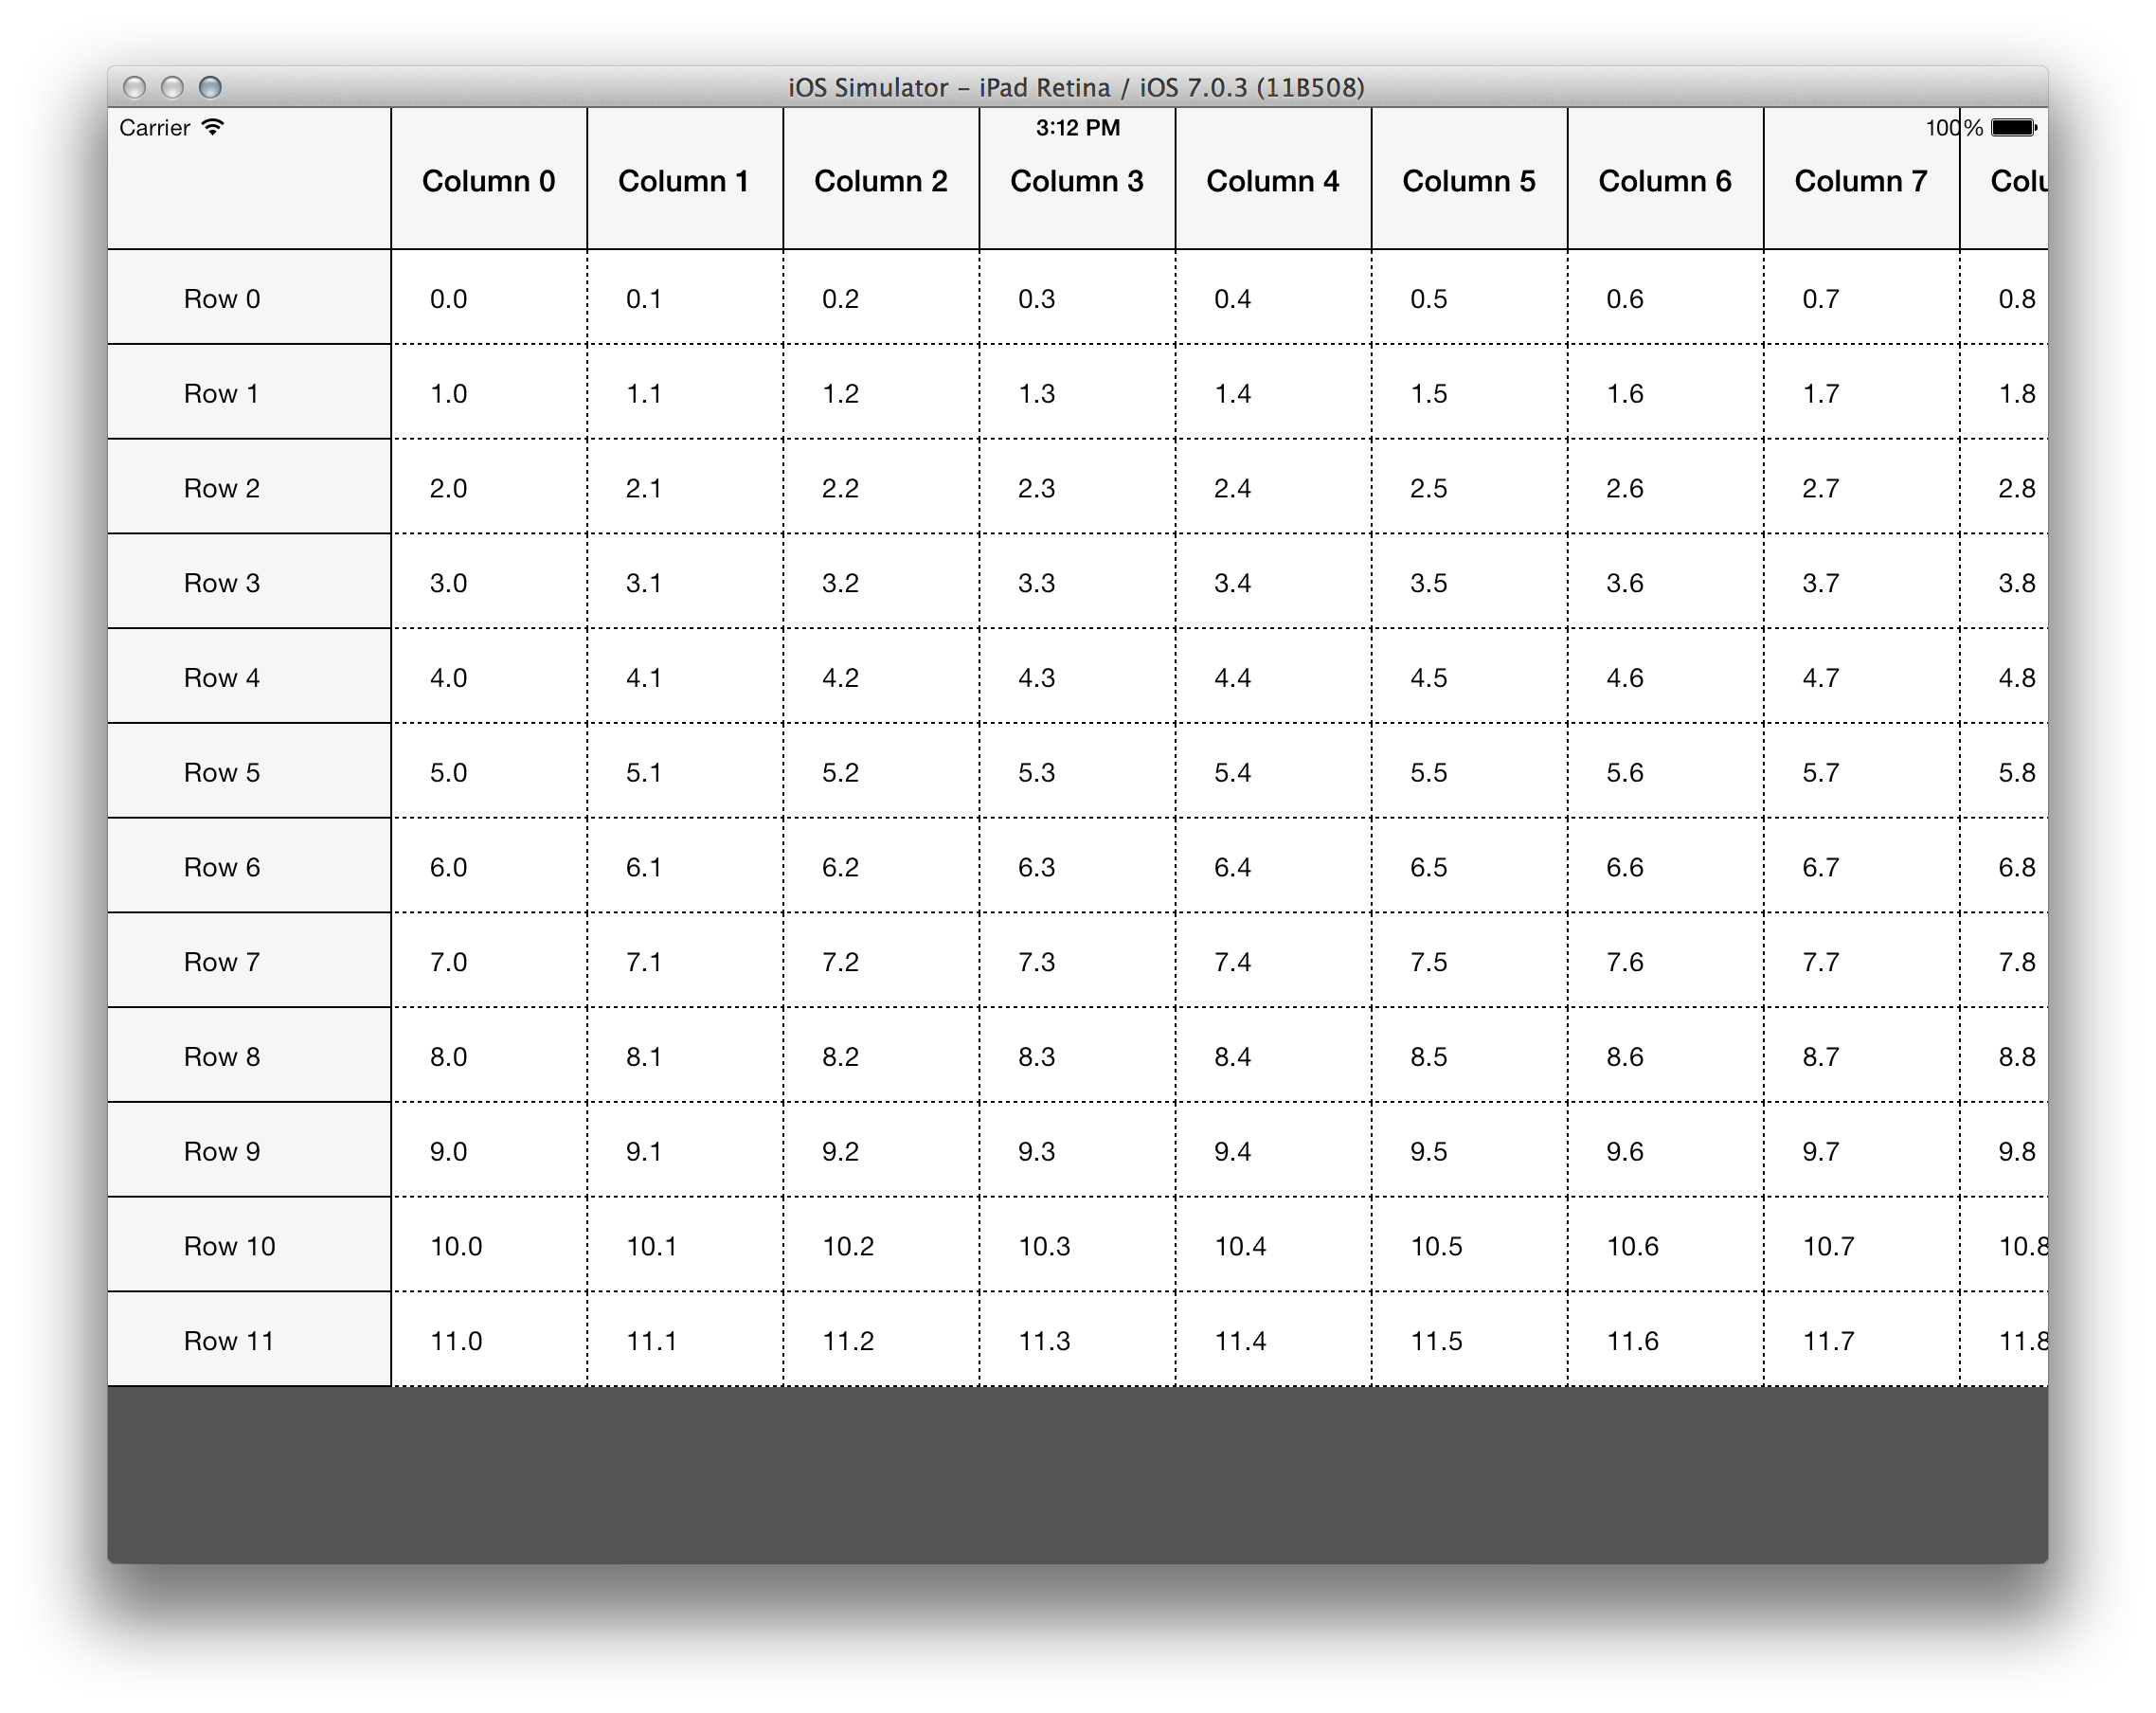
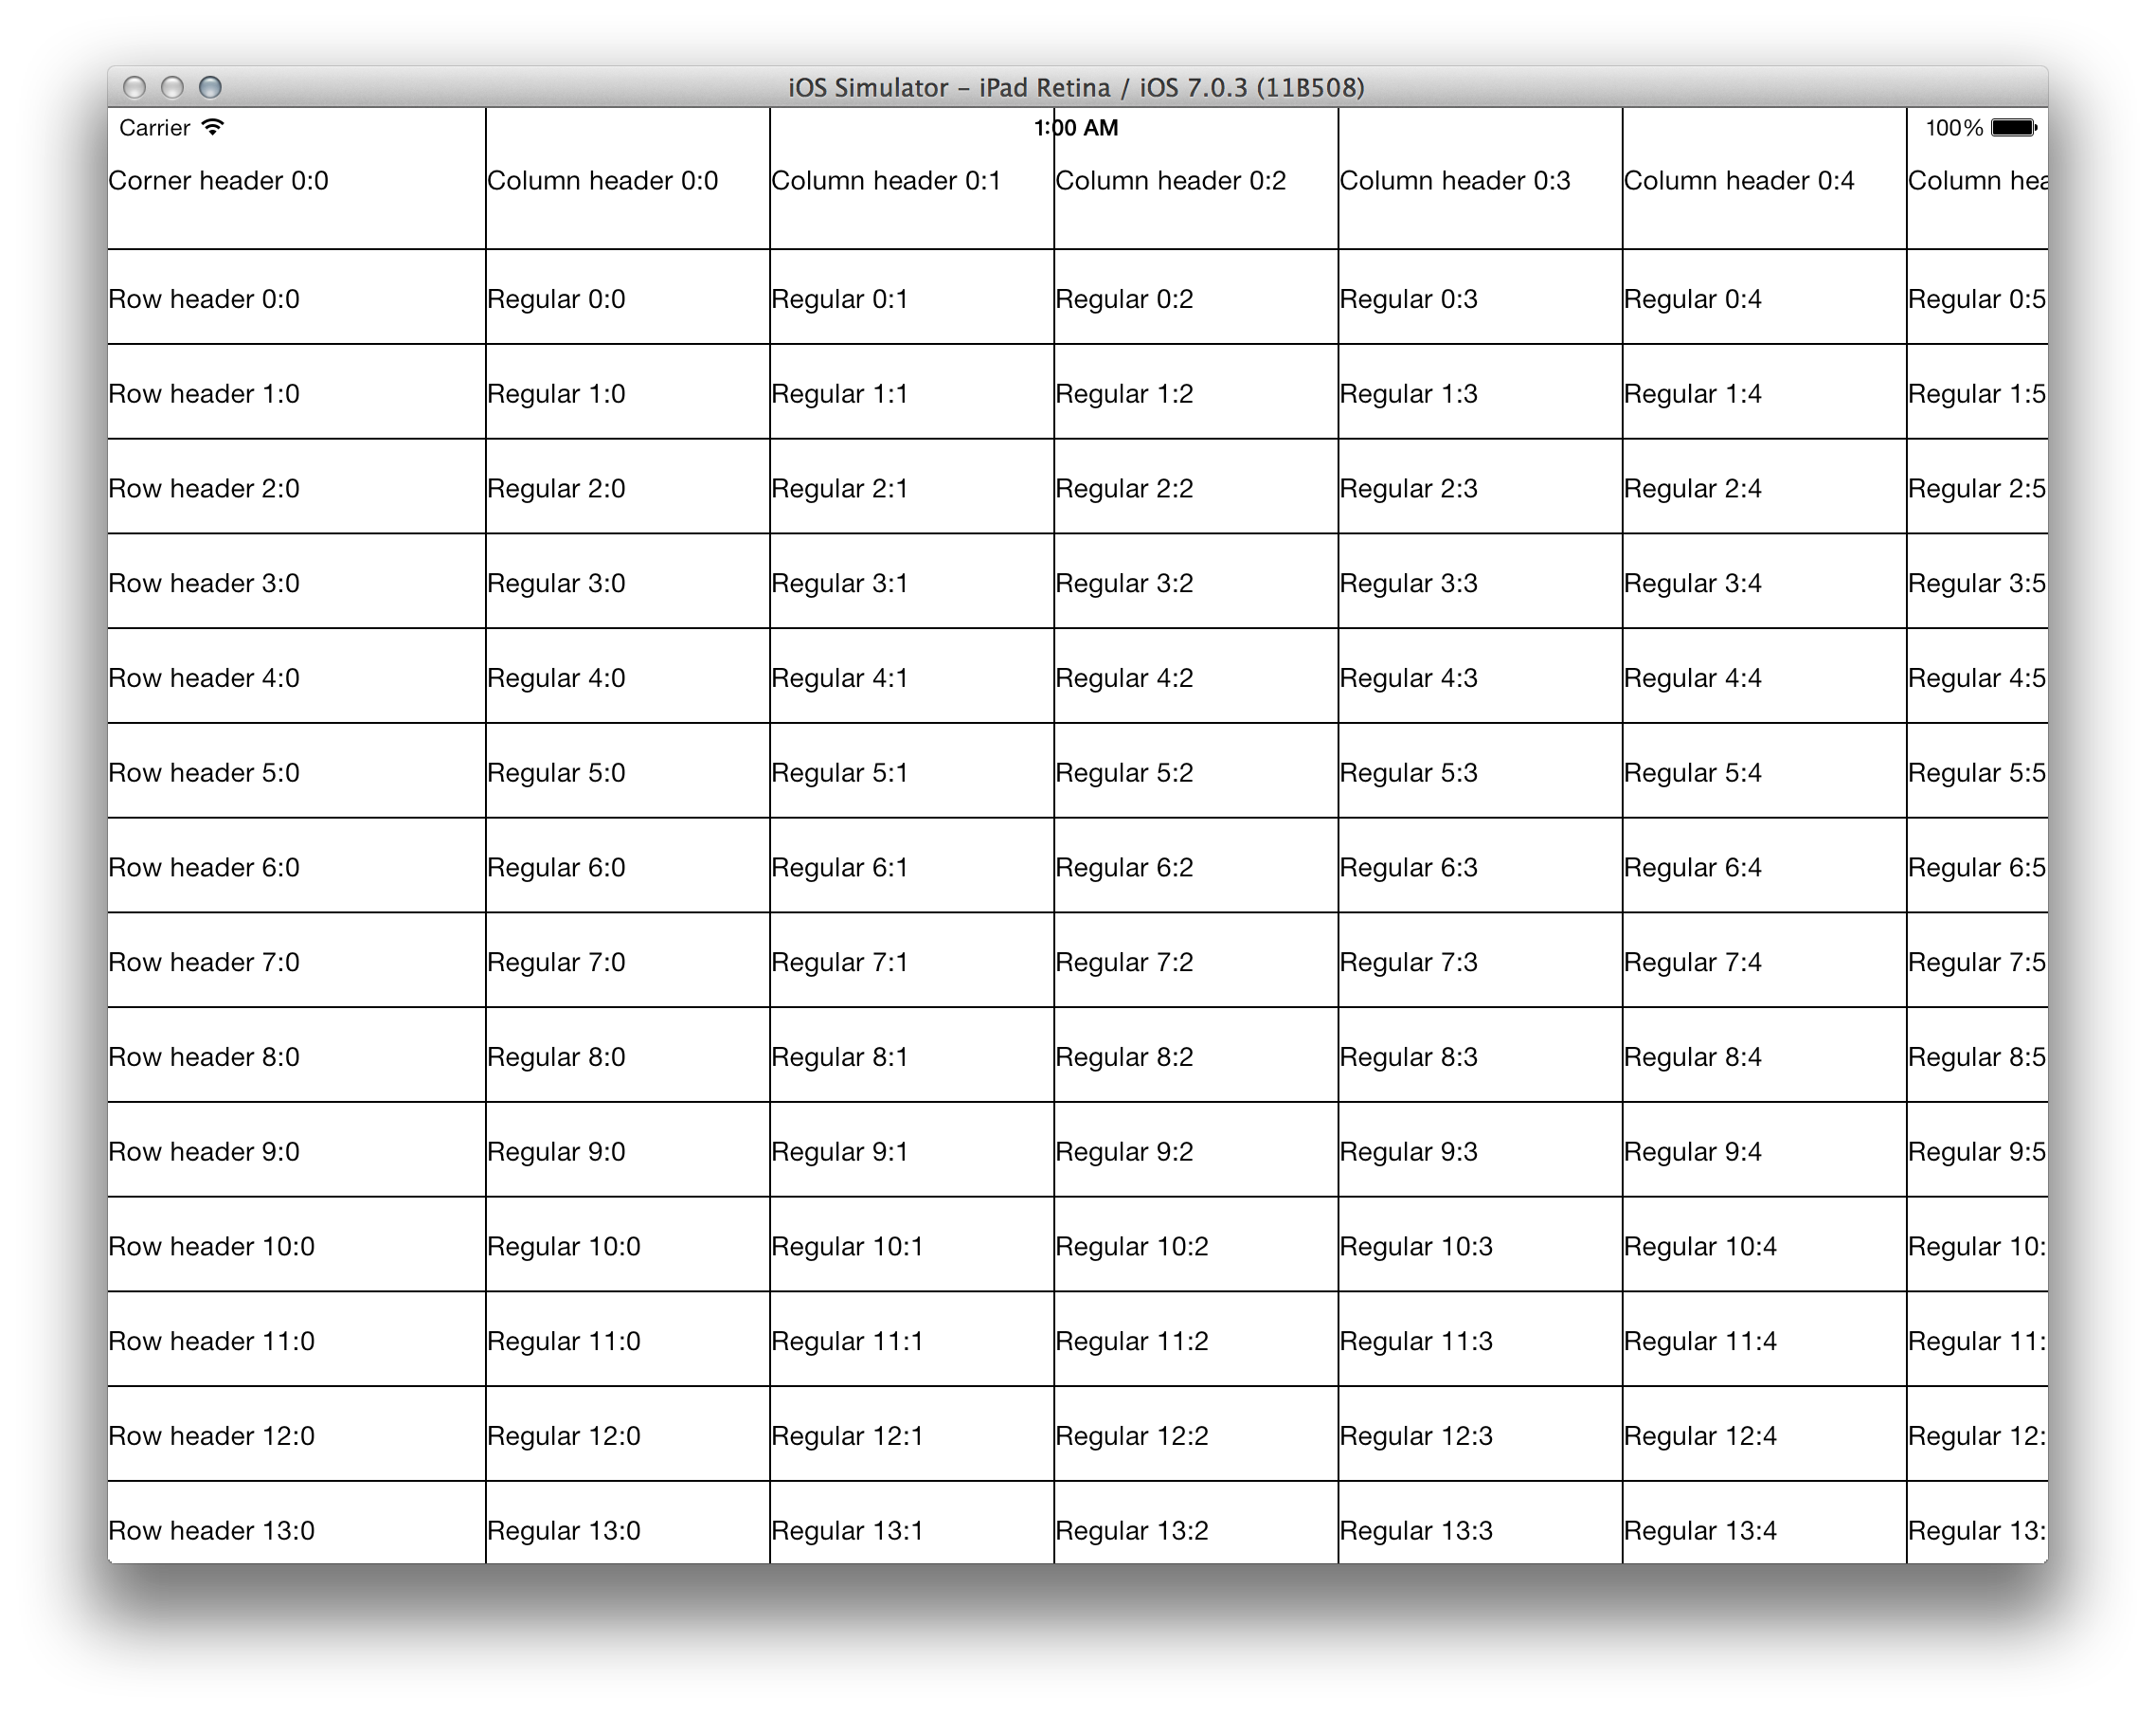
Mind that you have to set the license key in your project (you got it in email after downloading NGrid installer).Now we can build and run our application and see what happens.
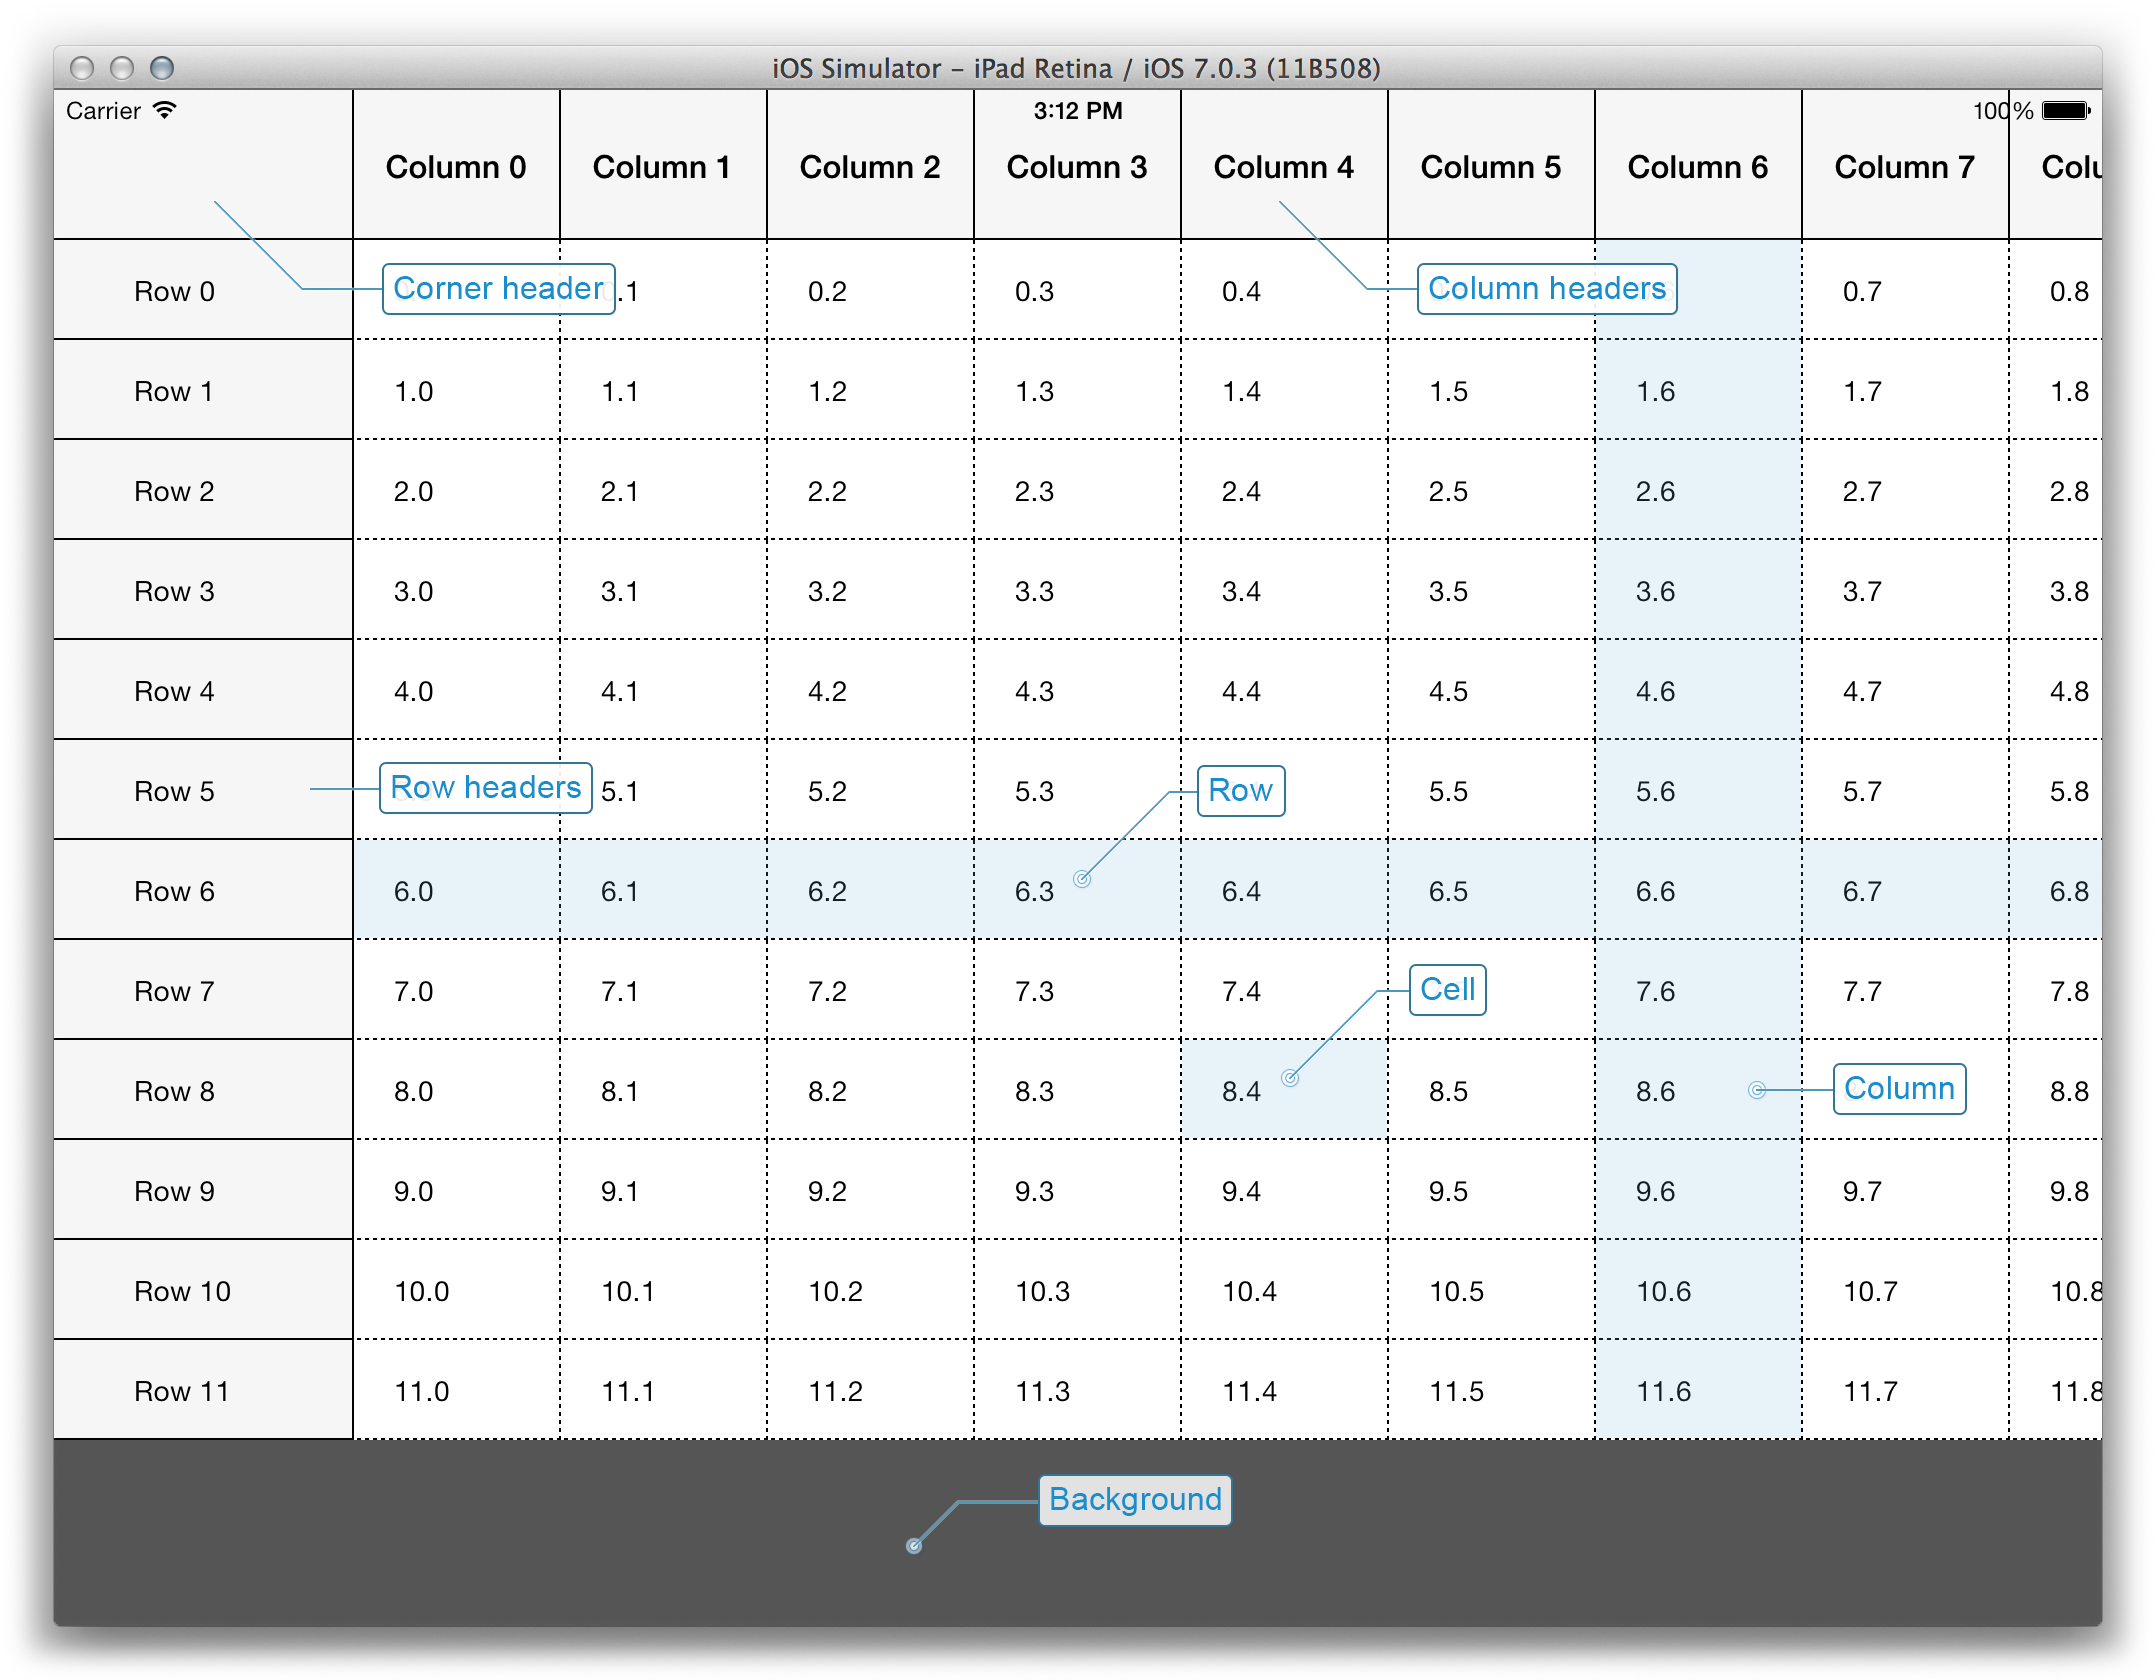
Customizing Appearance
The resulting table displays data but doesn’t look pretty enough. To fix it, let’s try to use NGrid style engine: set alignment and padding, change colors and fonts, configure borders, etc. In order to do this, we should define styles for row headers, column headers, and for regular cells.
Style for column header is shown below.
NGridCellStyle *columnHeaderCellStyle = [NGridCellStyle emptyStyle];
columnHeaderCellStyle.backgroundColor = [UIColor colorWithRed:246.0/255.0 green:246.0/255.0 blue:246.0/255.0 alpha:1.0];
[columnHeaderCellStyle setBorderColor:[UIColor colorWithRed:195.0/255.0 green:195.0/255.0 blue:195.0/255.0 alpha:1.0]];
columnHeaderCellStyle.textAlignment = NSTextAlignmentCenter;
columnHeaderCellStyle.textColor = [UIColor colorWithRed:50.0/255.0 green:50.0/255.0 blue:55.0/255.0 alpha:1.0];
columnHeaderCellStyle.font = [UIFont boldSystemFontOfSize:14.0];
columnHeaderCellStyle.leftPadding = 7.0;
columnHeaderCellStyle.rightPadding = 7.0;NGridCellStyle *rowHeaderCellSyle = [columnHeaderCellStyle copy];
rowHeaderCellSyle.leftPadding = 25.0;
rowHeaderCellSyle.textAlignment = NSTextAlignmentLeft;NGridCellStyle *regularCellStyle = [NGridCellStyle defaultStyle];
regularCellStyle.textAlignment = NSTextAlignmentRight;
regularCellStyle.font = [UIFont systemFontOfSize:14.0];
regularCellStyle.textColor = [UIColor colorWithRed:70.0/255.0 green:70.0/255.0 blue:75.0/255.0 alpha:1.0];
[regularCellStyle setBorderColor:[UIColor colorWithRed:195.0/255.0 green:195.0/255.0 blue:195.0/255.0 alpha:1.0]];
regularCellStyle.rightBorderDash = [NSArray arrayWithObjects:[NSNumber numberWithInt:1], [NSNumber numberWithInt:1], nil];
regularCellStyle.bottomBorderDash = [NSArray arrayWithObjects:[NSNumber numberWithInt:1], [NSNumber numberWithInt:1], nil];
regularCellStyle.leftBorderWidth = 0;
regularCellStyle.rightBorderWidth = 1.0;
regularCellStyle.leftPadding = 7.0;
regularCellStyle.rightPadding = 7.0;
regularCellStyle.backgroundColorInterchange = YES;
regularCellStyle.firstInterchangedColor = [UIColor colorWithRed:253.0/255.0 green:253.0/255.0 blue:253.0/255.0 alpha:1.0];
regularCellStyle.secondInterchangedColor = [UIColor whiteColor];Use styleLevel: to get any style level from the style manager. It receives NGridStyleLevelOrder value as parameter.
The level objects are the instances of NGridStyleLevel class. It contains methods to specify the style of any of the grid elements.
NGridStyleManager *styleManager = [((NGridProxyDataSourceImpl *)gridView.proxyDataSource) styleManager];
NGridStyleLevel *styleLevel = [styleManager styleLevel:NGridStyleLevelOrderLevel0];
[styleLevel setDefaultStyleForColumnHeader:columnHeaderCellStyle];
[styleLevel setDefaultStyleForRowHeader:rowHeaderCellSyle];
[styleLevel setDefaultStyle:regularCellStyle];- (void)setupAppearance:(NGridView *)gridView {
NGridCellStyle *columnHeaderCellStyle = [NGridCellStyle emptyStyle];
columnHeaderCellStyle.backgroundColor = [UIColor colorWithRed:246.0/255.0 green:246.0/255.0 blue:246.0/255.0 alpha:1.0];
[columnHeaderCellStyle setBorderColor:[UIColor colorWithRed:195.0/255.0 green:195.0/255.0 blue:195.0/255.0 alpha:1.0]];
columnHeaderCellStyle.textAlignment = NSTextAlignmentCenter;
columnHeaderCellStyle.textColor = [UIColor colorWithRed:50.0/255.0 green:50.0/255.0 blue:55.0/255.0 alpha:1.0];
columnHeaderCellStyle.font = [UIFont boldSystemFontOfSize:14.0];
columnHeaderCellStyle.leftPadding = 7.0;
columnHeaderCellStyle.rightPadding = 7.0;
NGridCellStyle *rowHeaderCellSyle = [columnHeaderCellStyle copy];
rowHeaderCellSyle.leftPadding = 25.0;
rowHeaderCellSyle.textAlignment = NSTextAlignmentLeft;
NGridCellStyle *regularCellStyle = [NGridCellStyle defaultStyle];
regularCellStyle.textAlignment = NSTextAlignmentRight;
regularCellStyle.font = [UIFont systemFontOfSize:14.0];
regularCellStyle.textColor = [UIColor colorWithRed:70.0/255.0 green:70.0/255.0 blue:75.0/255.0 alpha:1.0];
[regularCellStyle setBorderColor:[UIColor colorWithRed:195.0/255.0 green:195.0/255.0 blue:195.0/255.0 alpha:1.0]];
regularCellStyle.rightBorderDash = [NSArray arrayWithObjects:[NSNumber numberWithInt:1], [NSNumber numberWithInt:1], nil];
regularCellStyle.bottomBorderDash = [NSArray arrayWithObjects:[NSNumber numberWithInt:1], [NSNumber numberWithInt:1], nil];
regularCellStyle.leftBorderWidth = 0;
regularCellStyle.rightBorderWidth = 1.0;
regularCellStyle.leftPadding = 7.0;
regularCellStyle.rightPadding = 7.0;
regularCellStyle.backgroundColorInterchange = YES;
regularCellStyle.firstInterchangedColor = [UIColor colorWithRed:253.0/255.0 green:253.0/255.0 blue:253.0/255.0 alpha:1.0];
regularCellStyle.secondInterchangedColor = [UIColor whiteColor];
NGridStyleManager *styleManager = [((NGridProxyDataSourceImpl *)gridView.proxyDataSource) styleManager];
NGridStyleLevel *styleLevel = [styleManager styleLevel:NGridStyleLevelOrderLevel0];
[styleLevel setDefaultStyleForColumnHeader:columnHeaderCellStyle];
[styleLevel setDefaultStyleForRowHeader:rowHeaderCellSyle];
[styleLevel setDefaultStyle:regularCellStyle];
}((NGridView *)self.view).licenseKey = @"";
((NGridView *)self.view).dataSource = self;
((NGridView *)self.view).delegate = self;
[self setupAppearance:(NGridView *)self.view];
[(NGridView *)self.view reloadData];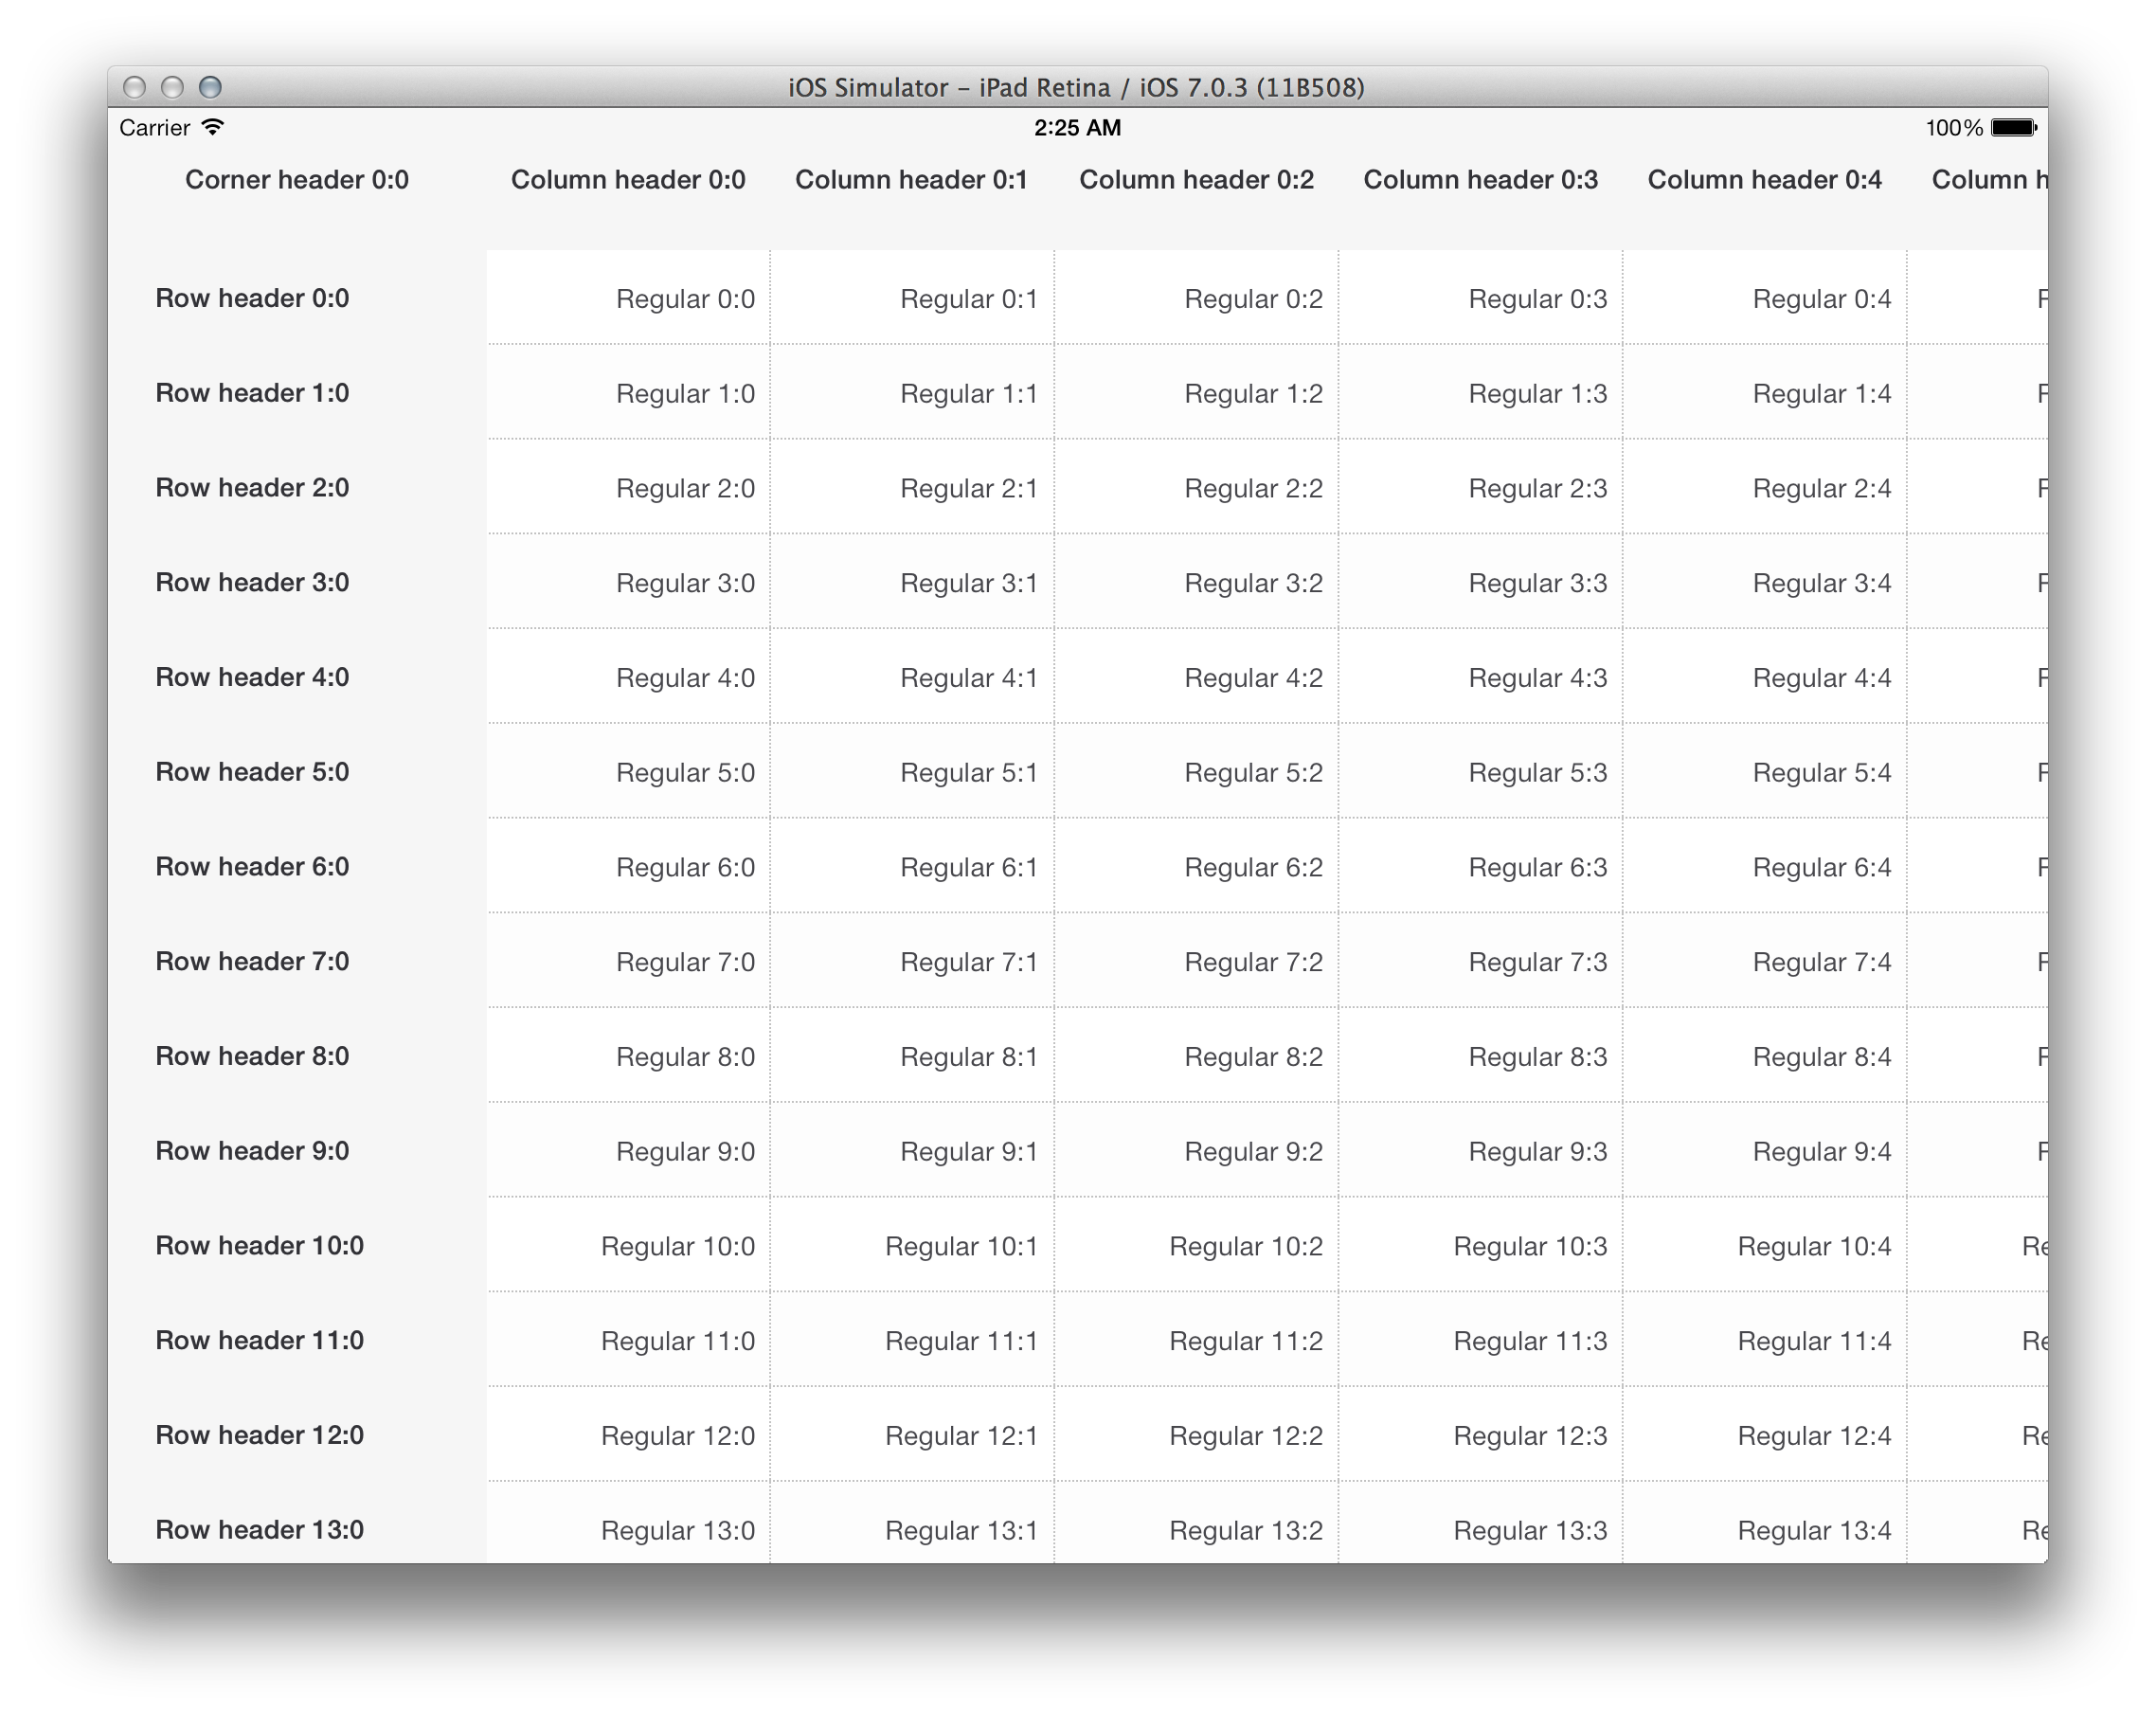
What's next?
You can find the full source code from this tutorial and the other information about using the NGrid framework in the samples in macOS .dmg. If you have any questions, feel free to contact us.